Introduction to Tessellations - Cooperative Activity
Tessellation Investigation -
Day 1
Today you
begin a short unit on tessellations.
Tessellations, or tilings, are patterns of polygon shapes that
completely cover a plane surface without overlapping and without leaving any
gaps. Two of the most typical
tessellations that can be found every day are square tiles that cover a floor
and rectangular bricks that make walls.
Tessellations can be as simple as these two examples, or as complex as a
Mosaic tiling or M. C. Escher print.
(If you have pictures of these available, your group may wish to look at
some examples.)
Tessellations
are fascinating even just to look at.
Even simple tessellations have many patterns that catch the eye. Tessellations are also fascinating to study
for the mathematics that are involved in the patterns. Symmetry, rotation, reflection, and
translation are not only important in these works of art, but are important
concepts of math that artists, designers, engineers, and others use on a
regular basis in their work. These same
concepts can also be found to occur in nature, and are what gives nature its
beauty and balance.
Before you
begin to create tessellations like Escher's, you need to study their building
blocks. Tessellations are designed
around different polygons. Recall as a
group what a polygon is, and write your group's definition below:
First you will study regular polygons. How are these polygons special?
You should
have copies of nine regular polygons, paper, and a chart on regular polygons to
complete this activity. Divide the
polygons among your group and follow the following directions for each one:
- Cut
out the polygon
- Take
a plain piece of paper and trace the polygon onto the paper. Mark one of the vertices point P.
- Rotate
your polygon piece around point P so one of its sides connects with one of
the sides of the traced polygon, then trace the polygon again. You should then have two connected
tracings of the polygon.
- Repeat
step three as often as necessary to determine whether the polygon covers
the region around point P without overlapping or leaving gaps. If the polygon fits perfectly around
the point, the polygon tessellates.
If the polygon tessellates, fill the entire piece of paper with the
design.
- Fill
in the corresponding box on the chart ("Does it Tessellate?").
Filling in
the rest of the chart will help you see why some regular polygons tessellate
and others do not. Begin by finding the
sum of the interior angles in each polygon, and filling in that part of the
chart. Some of these you may know
already. To find the ones you do not
know, divide the polygon into triangles by drawing segments from one vertex to
the others (see Figure 1). Recalling
that each of those triangles contains 180 degrees, you should be able to find
the total of the interior angles. Also
fill in the number of triangles each polygon was divided into and the number of
vertices each polygon has. From this
information, determine the measure of one of the interior angles. (How could you check these answers?) Is this measure a factor of 360? Fill in the chart accordingly.
From the information in your chart, state why some regular
polygons tessellate and others do not:
Why do you think the 360o is important?
How are the number of triangles found in a polygon related
to the sum of its interior angles?
How are the number of triangles related to the number of
sides and vertices?
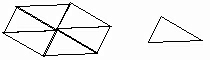
Now
investigate some non-regular polygons, and see if they tessellate. Have each member of your group make a
different type of triangle (obtuse, acute, isosceles, etc.), cut the triangle
out, and trace it on a blank piece of paper around a point to see if it
tessellates. (Note: Instead of keeping
the same vertex of the triangle at the point, flip the piece over to get a
different vertex at the point, but keeping the congruent sides together. See Figure 2 below.) If the triangle tessellates, fill the entire
paper with the design. Do the same with
different types of quadrilaterals (rectangles, kites, parallelograms,
trapezoids, concave, etc.). Try some
different pentagons and hexagons also.
Each member in your group should try at least one of each type (triangle,
quadrilateral, pentagon, and hexagon).
If you have time as a group, or on your own, you may try more.
|
|
|
| Figure 1: A hexagon divides into 4 triangles | Figure 2: Tessellate a triangle by connecting congruent sides while changing the vertex that meets at the point. |
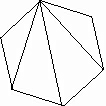
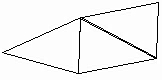
Chart for Investigation of Regular Polygons

Tessellation Investigation -
Day 2
This day builds on concepts the students should have discovered doing the cooperative lesson the day before. The students should have all of their work from that lesson on hand. A suggested class discussion follows:
Part I: Review of the
Regular Polygon Chart
Which regular polygons did your group find to tessellate?
(An equilateral triangle, a square, and a regular hexagon.)
Why did they tessellate? (Their interior angle measure was a
factor of 360 degrees.)
Why is this important? (There are 360 degrees around a
point, so in order for a shape to fit around a point, the angles must be a
factor of 360.)
When you divide 360 by the angle measure for these polygons
you get a whole number. What does this
number tell you? (It is the number of
tracings of that polygon that fit around a point.)
How are the number of triangles found in a polygon related
to the sum of its interior angles? (The
sum is a multiple of 180 (degrees in a triangle) times the number of
triangles.)
How are the number of triangles related to the number of
sides and vertices? (There are always
two less triangles.) Have the students
speculate why. You may wish to develop
the formulas below at this time:
Sum of interior angles =![]() Measure of
each interior angle =
Measure of
each interior angle = ![]()
(n=number of
sides/angles)
Part II: Observation of
Triangle Tessellations
Have the
students take out all of their triangular tessellations for use in the
following discussion.
Besides the regular triangle, how many of you found a
different triangle that tessellated? (All triangles should have tessellated.)
Have the students speculate whether all triangles tessellate and why that is so. Some students may have tried to tessellate a triangle using the same vertex at the same point, which will not form a tessellation. The key students should discover is that at each point, all three vertices of the triangle are represented twice. This follows the general example below: angle 1 + angle 2 + angle 3 = 180 (a straight line on top and underneath) times 2 = 360 <---complete fit around a point.
What would happen if you erased some of the same line
segments in one of your triangle tessellations ? (Model this on the overhead)
(You would get a quadrilateral that tessellates.)
Is this always true? (Yes.) Have the students speculate why.
Help the students discover the following types of symmetries in their triangle tessellations (give or have the students develop definitions for translation, rotation, reflection, and glide-reflection and their corresponding symmetries when applicable). Have the students trace a section of their tessellation on an overhead sheet. This way they can move, rotate, and flip their design over the original to get a better view of the symmetries. Model this on the overhead.
Translational symmetry - line up the tessellations, and then
slide one polygon until it repeats in the same position (orientation and
size). The distance moved is the
magnitude of the translation, and the direction moved is the direction of the
translation. This occurs in many
different ways.
Rotational or n-fold symmetry - line up the tessellations
and then rotate the overhead copy around vertices, midpoints of the sides, and
centers of the polygons. Two-fold,
three-fold, and six-fold symmetry is commonly found this way (but not always).
Reflective symmetry - have the students place miras or
mirrors from vertex to vertex, midpoint to midpoint, or midpoint to
vertex. Reflective symmetry will be
shown if the projections fit onto the original tessellation perfectly.
Glide-reflection symmetry - By definition, this is a
combination of translational and reflective symmetry. All tessellations have translational symmetry. If a tessellation has reflective symmetry,
then it also has glide-reflection symmetry.
It is possible to have glide-reflection symmetry without reflective
symmetry. This most likely will be seen
if, when using a mira or mirror to find reflective symmetry, the projection
seems to be slid over a bit.
Part III: Investigation of Quadrilaterals
Have the students take out all of their quadrilateral
tessellations. Besides the square, how
many of you found different quadrilaterals to tessellate? (All should have tessellated.)
If we combine this result, with the discovery we made about
triangle tessellations turning into quadrilateral tessellations, speculate on
the tessellation of quadrilaterals. (All quadrilaterals tessellate.)
The key is
similar to triangles. At any point in
their tessellations, all four vertices of the quadrilateral will be represented
once. Since the sum of the vertices of
any quadrilateral is 360, this will fit around the point.
Have the
students discover the different types of symmetry in their quadrilateral
tessellations using the same methods as with the triangular tessellations.
What would you get if you erased the same line segment in
one of your quadrilateral tessellations?
(A hexagon that tessellates.)
What is special about these hexagons?
(Opposite sides are parallel and congruent.)
Part IV: Investigation of
Hexagons
Did everyone find their hexagons to tessellate? (Not all
tessellate.)
So only some hexagons tessellate. What is similar about the ones that do tessellate? (The opposite sides are parallel and
congruent. If this is not true, the
hexagon will not tessellate.)
Have the
students speculate on why this is true.
In hexagons that tessellate, the congruent and parallel sides form three
sets of equal angles. The sum of these
angles is 360. So around one point, one
of each angle is represented, perfectly fitting three of the hexagons around.
What kind of strange shapes do we get if we erase some of
the same line segments in the hexagon tessellation? (Varies.)
Part V: Assignment
Have the
students make a non-regular hexagon that will tessellate. Have them trace the tessellation to fill an
entire piece of paper. Then have the
students discover the different types of symmetry in their regular hexagon
tessellation using the same methods as with the triangular tessellations and
write about their findings as a journal assignment. Encourage them to comment on anything else they find
interesting. (It may be helpful to have
a list of the methods used to find symmetry available to them.)
Tessellation Investigation -
Day 3 (optional)
Part I: Semi-regular
Tessellations
|
Review by discussing what the students have written in
their journals. Did anyone find a pentagon that tessellated the other day?
(Not very likely.) Could there be a pentagon that tessellates? Could there be other non-regular polygons quadrilaterals, and hexagons as foundations is the key. |
|
Have the
students form groups of three or four, and distribute pattern blocks to the
groups. Have the students use only the
triangle, square, and hexagon pieces.
Note again how the tessellating pentagon was made up of a square and
triangle. Use the overhead tessellation
to show that around one point in this tessellation are three triangles and two
squares. Have the students speculate
why this combination fills the point.
(The sum of the angles around the point is 360.) This arrangement of three triangles and two
squares around a single point is denoted as a 3.3.3.4.4 combination. Have the students work in their groups using
combinations of the triangle, square, and hexagon to fill the space around a
point. (They should represent with the
blocks the following ten combinations: 3.3.3.3.3.3 , 3.3.3.4.4 , 3.3.4.3.4 ,
4.4.4.4 , 3.6.3.6 , 3.3.6.6 , 3.3.3.3.6 , 3.4.4.6 , 3.4.6.4, and 6.6.6 - there
are a total of 21 such arrangements using regular polygons. In order to find the others, a regular
octagon, dodecagon, decagon, 15-gon, 18-gon, 20-gon, 24-gon, and 42-gon are
needed.)
Note that at
every point on the pentagon tessellation, the same pattern of pieces
(3.3.3.4.4) is found. This makes it a
semi-regular tessellation, because it is made up of regular polygons and has
the same arrangement of polygons at every point. Assign groups to make tessellations out of the 3.6.3.6 ,
3.3.4.3.4 , 3.3.3.3.6 , and 3.4.6.4 combinations with the pattern blocks. (These are the other semi-regular
tessellations that can be formed with pattern blocks, other than 3.3.3.3.3.3 ,
4.4.4.4 , and 6.6.6 which are regular tessellations also.) Discuss the tessellations that result,
particularly the fact that the same combination of polygons are found around
each point. Encourage any observations
of symmetry. Discuss what polygons
would result if certain line segments were erased. Have the groups try to form tessellations with the other
combinations. Note how the polygon
combinations are not the same at each point.
Encourage any observations of symmetry.
Discuss what polygons would result if certain line segments were erased.
Part II: Duals and other
techniques
Note that they
have been forming new tessellations by erasing line segments in other
tessellations. The opposite can also be
done in some ways. Dual tessellations
are formed by connecting the centers (centroids) of the polygons in a
tessellation. Tessellations can also be
formed by connecting the midpoints of the sides of the polygons in a
tessellation. Demonstrate each using
any simple polygon tessellation. Have
the students use their regular polygon tessellations to try these techniques. Have them note any symmetry or other
observations found from the overlapping tessellations that are formed.
Assignment:
Have the
students trace two semi-regular tessellations of their choice. With a different colored pencil, have them
do a dual tessellation on one, and use the technique of connecting midpoints on
the other.
Tessellation Investigation:
Day 4
From this day
on, the students can study and make Escher-type tessellations. Directions for many simple Escher-type
tessellations and some possible extensions can be found on the following pages. These are arranged in order from
easiest to hardest. Included with each
set of directions, is a sample tessellation of that type. To help you avoid copyright laws, I included
these uncopyrighted tessellations (made by myself and some students) so you can
feel free to copy and use them as you see fit.
Before
attempting to make any of these tessellations, students should always study the
sample tessellation drawing. Students
should find the different types of symmetry, the polygon on which it is based,
and how the polygon was adapted into a tessellating figure. They may also be encouraged to comment on
the use of adding details to the picture, or the use of shading to help make
the different orientations of the tessellating figure stand out. This step should be done with the whole class
the first few times to help model what they should look for. Later this can be done individually or in
groups.
The next step is
to have them make the actual tessellation.
Again, the first few times the teacher should model the directions so key
words such as "flip," "rotate," and "translate"
are understood. This is why I like to
use the overhead sheets for this part.
This way the students can actually see how the words work. Also, if they make a mistake, it is easily
corrected. The overhead sheets material
is also much more sturdy than paper.
Once the students get proficient at making the pieces, the directions
can be handed out to be used by individuals or in groups.
A few notes about the actual tessellation pieces:
- When
making the pieces and drawing the "line designs," it is usually
best not to have the line cut in or out too far - especially near the
vertices. This may cause
overlapping into the other lines, as well as overlapping tessellating
designs.
- If
the lines on a piece are very intricate, the piece may be very difficult
to trace perfectly each time.
- Since
overhead pens are thick and messy, and since no one is perfect at tracing
and cutting, when tessellating the piece on paper, some
"fudging" will almost always have to be done. The best way to avoid this would be to
get a hold of a computer art program (such as Tessellmania or Clarisworks/AppleWorks)
that will allow you to make crystal clear tessellations.
- Always
encourage the students to be creative in their designs. Encourage them to be creative in
determining what their piece looks like, and to detail their work
accordingly. Detailed and creative
tessellations are the most spectacular.
Glossary of Tessellation Terms
Angle of Rotation - the
measure of the angle a figure is rotated about a point
Centroid - the center of
gravity or balancing point of a polygon
Dual Tessellation - a new
tessellation formed by connecting the centroids of a polynomial-based
tessellation
Glide Reflection - a
transformation that moves a figure in a slide and then reflects it
Glide Reflection Symmetry -
when a figure coincides with itself after being reflected and translated
Magnitude of a Translation -
the distance traveled by a point in a translation
N-fold Rotational Symmetry -
when a figure coincides with itself after a 360/n degree rotation about a point
Reflection - a
transformation that mirrors a figure
Regular Tessellation - a
tessellation with only one type of regular polygon
Rotation - a transformation
that turns a figure about a point
Semi-Regular Tessellation -
a tessellation of two or more regular polygons, with sides of equal length,
that has an identical combination of polygons around every point
Tessellation - a pattern of
one or more shapes covering a plane without any gaps or overlapping
Transformation - a movement
of a figure to a new location, keeping its size and shape constant
Translation - a
transformation of sliding a figure to a new position without rotating the
figure
Translational Symmetry - when a figure coincides with itself after a translation
