Building the Square Wheels Exhibit
| Materials Needed: | Approximate Costs: |
| 3 - 1” x 6” x 6’ pine boards | $12.00 |
| 1 - 1” x 12” x 6’ pine board | $ 4.00 |
| 2 - old automotive belts or thin rubber stripping 6’ long | (we used old auto belts) |
| 1 - plexi-glass 1/8” thick | $20.00 |
| 1 - 3” PVC pipe (5 ½” long) | donated |
| 1 - ½” x 8” threaded rod with 2 nuts and washers | donated |
| dry wall screws | $ 3.00 |
Note: We closely followed the instructions for building the Square Wheels Exhibit from the San Francisco Exploratorium's Cookbook Recipe #201.
Construction:
1. First, we cut out a 10” x 10” cardboard square. We placed centering lines corner to corner and center to center. We found the distance center to corner and from the center to the outside edge at the middle point of a 10” side. This determined the high point and low point of the roadway arch. The length of travel per side was figured to be 8 ¾” ("diameter" of each arch). This cardboard piece was our sample to help verify the contour of the arches.
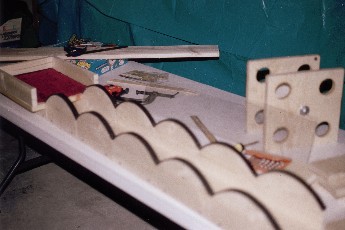
2. Using a variable speed jigsaw, we cut the arches from a 1” x 6” board. Each arch had a width of 8 ¾”, an overall height of 4 7/8” and a height before the curve of the arch began at 2 ¾”. (A router was originally recommended to cut the arches, but we found a steady hand and sanding the blocks when they are clamped together will result in fairly uniform arches.) We cut a total of 10 arches to have a road with 5 bumps on each side. The hardest part of this exhibit was establishing the correct catenary curve for each bump.
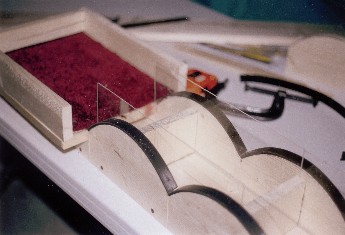
3. The arches were then screwed to the sides of a 1” x 6” x 6’ pine board by using 1 ¼” drywall screws. We were sure to drill pilot holes to avoid cracking the wood. We checked both sides were aligned for smooth travel. Pieces of 2 old serpentine v-belts were cut and glued to the tops of the arches. These were temporarily nailed at the ends of the pieces until the adhesive dried.
4. We then cut strips of plexi-glass 5 ½” x 43 ¾” and mounted them on the inside of the roadway’s arches.
5. A starting point was added to the roadway by constructing a ramp with a 45° angle. From the lowest point of the roadway, supports were cut to fit as needed.
6. A place for the wheel to rest was needed. A 14” x 11” rest was constructed from pine wood pieces. A 3” high fence around the edge of the rest was added. We also added a small piece of carpet to help slow down the wheel and keep the noise down when the square wheel stopped.
7. The 2 sides of the wheel were cut from 1” x 12” pine wood board. (You must buy a larger piece and cut it down.) A piece of 3” PVC pipe 5 ½” long was used as a spacer for the two halves. A 8” piece of ½” threaded rod was used to hold the halves together. We cut 4 2” holes in each square wheel to lighten the weight as it traveled across the roadway.

Back
to Catenary Road (Square Wheels) Home
Information on Catenary Curves
Related Exhibit: Catenary Arch Home